TagBot™ Basic Markup Operations
Load a File
Start with a template that is already finished, debugged, and ready to use. Either open the file from the menu or paste the code into the markup window.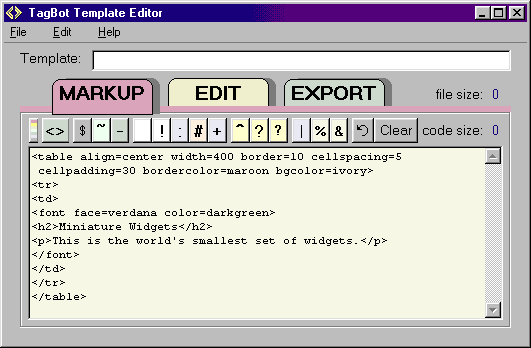
Add TagBots to your Code
Decide what parts of your template you would like to change on a regular basis and start tagging your code as shown in the illustration below. The simplest tagging can be accomplished using only the Text Tagbot button, but other TagBots can provide more powerful options.
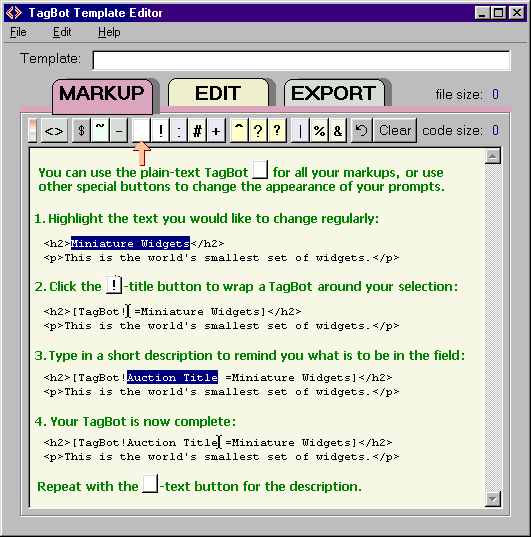
As shown in the example above, a full TagBot [TagBot!Auction Title =Miniature Widget] consists of the TagBot Keyword ([TagBot), a Style Symbol (!), the Prompt (Auction Title), and then the equal-sign followed by the default data to display (Miniature Widgets), and the closing bracket (]). The TagBot Keyword and Style Symbol must be together, but the other parts can contain spaces. The program will remove the excess spaces that surround the default data or the prompt. TagBots can not be nested or interleaved, although wrapper tags for Sections can contain normal TagBots.
The tagging options from left to right are:
- [ ] Color Browser - Enter a color at the cursor or change a highlighted color code to a new value. Clicking the button will open the color browser to visualize or change a highlighted color code or select a new color. The placed color will be a standard Internet #Hex value; although the tool will recognize RGB(0,0,0), Internet color names, shorthand 3-digit #Hex, and standard 6-digit #Hex values.
- [<>] Sections
- Whole groups of code and text can be marked as optional with this special wrapper tag <TagBot> </TagBot>. The EDIT screen will display a checkbox to include or omit each marked section. Sections can not be nested or interleaved, but must be separate groupings. Unchecked sections will be grayed.
With a recent update, the section wrapper start-tag can be expanded to force checked <TagBot =true> or unchecked <TagBot =false> sections. Like the inline TagBots, a prompt can be added to the section wrapper tag to remind users of the purpose, with the default checkbox value set to true or false.
<TagBot Include this section for more photos =true>
- [$] Menu
- Add a menu option to the program's Help menu. The prompt will appear on the menu and the default data will be a local file or web URL that will be hyperlinked into the menu selection. This field will not appear on the edit screen or in the browser code.
- [~] Comment
- This field is used to pass messages or instructions to the EDIT screen. A comment field will display as green text on the EDIT screen, but won't pass through to the browser code.
- [-] Divider
- Add visual dividers to improve the EDIT screen layout. The Divider can carry a non-editable prompt and won't pass through to the browser.
- [ ] Text
- Code marked with this default TagBot, using the "space" style symbol, will display in a normal text field on the EDIT screen. This TagBot can be used for most types of replacements if the user does not wish to learn the other tags. The data in the text field will pass to the browser code.
- [!] Title
- A bolder prompt and Text field will appear on the EDIT screen, reminding the user that this is a title. The data in the text field will pass to the browser code.
- [:] URL
- A blue text field will display on the EDIT screen, and if no default data is passed through, the http:// prompt will appear to remind the user that a URL is expected. The data in the text field will pass to the browser code.
- [#] Variable
- An orange text field will display on the EDIT screen. Although there is no format requirement, the orange is to remind the user that an attribute value (like a color or number found inside a tag) is expected here rather than long text. The data in the text field will pass to the browser code.
- [+] Include
- This is a very special purple field. The default value must be the name of a file on the local hard drive. The program will fetch the contents of the file and include them in the exported HTML that is passed to the browser. If the file is not found, it will be skipped. This feature makes it simple to maintain chunks of code, like PayPal scripts or Terms of Sale, in another file that is separately maintained.
- [^] Global Theme
- Themes are for the more advanced designer. A template can have one theme TagBot, which is the highest level TagBot, that points down to Global Variable lists for its data. The data will be found in a specific position in the option list, matching the position of the theme-name in the Global Theme's option list. Global Variables that are to be used within a theme will contain the Theme-symbol (^) and must have the same number of options as laid out in the theme TagBot. It is useful to use spacing in the option lists to visually align the data into columns. The Theme option list would be at the top and would contain the names of the themes. In the columns directly below, would be each Global Variable value associated with that theme. The Theme options are displayed on the EDIT screen, but only the final variable substitutions pass to the browser code.
- [?] Global Variables
- Global variables replace editable values that are used redundantly throughout a template. For instance, the user might select a font color only once, and then use a Global Target in every location the color would be used. A Global Variable contains more parts than the other TagBots. The
?-symbol is immediately followed by a variable Name that contains no spaces or special symbols. (The variable Name will be used to locate variable Targets of the same name.) After the variable name, the rest of the TagBot looks normal. A Style Symbol is selected to match the type of data for the EDIT screen, and a prompt and default data follow. The Global Variable field is displayed on the EDIT screen, but only the final variable selections pass to the browser code.
In the special case of providing data for a Global Theme, the subsequent Style Symbol would be the^-sign and the default data would be divided into an appropriate option list. Global Variables that support a theme will not be displayed on the Edit screen, but the ultimate variable replacements will pass to the browser code.
- [?] Global Target
- A Target is placed wherever global changes are to be made, such as carrying the Host URL or a font color through to several different locations within the template. The Target TagBot is shorter than the other tags and contains only the Keyword and Symbol, immediately followed by the global variable Name and closing bracket, with no spaces like this
[TagBot?Color3] . It is helpful to use the Find feature of the program to locate all occurrences of a value, like #C0C0C0, for replacement with the appropriate Target tag. The target variable is not case-sensitive and must match a name used in a Global Variable tag. The target variable will remain invisible until its replacement is passed to the browser code.
- [|] Option Lists
- The vertical bar or pipe is not a true TagBot, but is used to divide the Default data into an option list from which to choose. The first item in the list becomes the default value. The entire Option list is passed to the EDIT screen as radio-button options. Extra spaces used to make the list easier to read are not passed through, but line breaks are passed through and should be avoided when the data is to be part of a standard HTML tag or URL. If an option in the list contains only spaces, then it is used as a spacer between its neighboring options on the EDIT screen, without a radio button. When two adjoining pipes are encountered, the data immediately following is selected as the default, rather than using the first item as the default.
- [%] Option List Color chips
- HTML colors can be displayed in the option list as color chips on the EDIT screen. To display chips, there must at least one | in the option list. The colors must be standard 6-digit hex numbers that start with the # symbol. The latest version of TagBot also supports named Internet colors. Clicking on a color chip will enter the color's value in the text field. Right-click the color chip to bring up the color editor and change the chip color.
- [&] Option List Image chips
- This is an advanced designer feature. Images (icons and background tiles) can be displayed in the option list as image-chips on the EDIT screen. To display chips on the EDIT screen, there must at least one | in the option list and the image must be available in the same local directory with the template. Clicking on an image-chip will enter the image's file name in the text field. Because an image-chip does not contain a full URL path, the base URL (host path) must also be included in the template code in front of the file name where the icons and tiles would be used. Images can be dragged from the desktop to the image chip for inclusion, but they must ultimately be hosted online.
- Single Tag Undo
- This button will remove the last tag if no editing or screen swapping has occurred.
- Clear Tags - TagBots will be removed from the selected code. The Default text in the tag will be restored back into the template. Partial tags can't be removed and nested tags, which aren't allowed, do not clear completely. The program can not restore values for Globals, so it is wise to clear only portions of a template at a time, and check it when clearing code that contains globals.
Save your Template
At any point during the tagging process, it is a good idea to save your work in progress, Use the "Save As" option to name your template to a TPL file. By naming it with the TPL extension, you will be reminded that it is a template and not a working HTML file.
Look at your new Fields
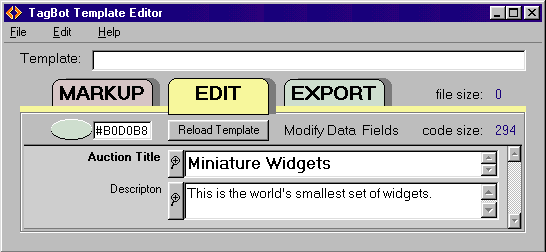
Click on the EDIT tab and then reload the template changes into the EDIT screen. You can flip back and forth between the MARKUP Screen and EDIT screen to adjust your newly created template, but every time you make a change on the MARKUP screen, you will need to click the "Reload Template" button to update the EDIT screen.
The Code is Ready to Use
Once you are happy with the available fields, you are ready to use your new template and change the displayed data. You can accept the default data or change it for each new web page you want to create. From here on out, you will be making changes to exported HTML and not to the Template itself.
At some point you may want to change the default answers, without actually editing the template tags. While on the EDIT screen, you can use File > Save Edited Data Fields to save your edited fields as the new default answers. You can permanently change your original template or save as a new template. This is a fairly easy method for creating additional templates for different themes.
See More
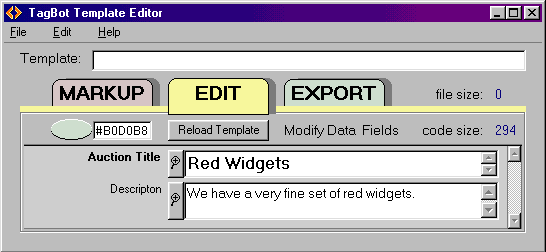
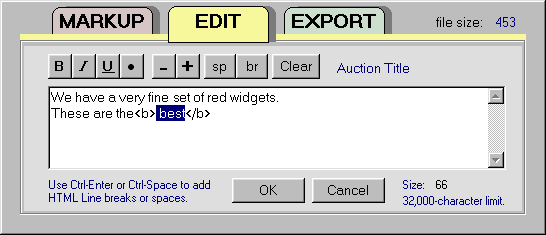
When viewing the default data fields presented on the EDIT screen, you can click the magnifier icon to see a full-screen view of the data. A few shortcut keys on the full-screen view provide some common HTML tags that one might use in a description or title - these are only available for fields that are tagged as text or titles. Simply highlight the text to tag and click a button to add the tag. We've added bold to the highlighted text in the example below. The Clear-button will erase any of the tags that were inserted within the text that has been highlighted. It does not erase the text. Ctrl-keys can be used as shortcut tagging keys (see the edit menu) and Ctrl-Alt keys will undo the specified tag. Text editing is limited to 32,000 characters per field, which is usually never reached.
Clicking on the magnifier for an Include-File field will open a file management window instead of the full-screen view.
Export the Code
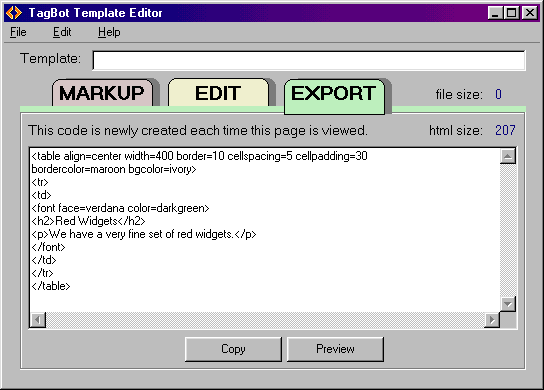
Preview your code at any time by clicking on the EXPORT tab. Each time you click to reach the EXPORT screen, the code will be freshly created, so don't make any interim edits to the HTML code on the Export Screen or you will lose them with each new export. The final result on the export screen should look nearly identical to the code you started with before marking it with TagBots.
The COPY button at the bottom of the EXPORT page will copy the contents of the HTML code to the clipboard for pasting into your listing or auction management program. The Preview button will open your browser and display the results of your HTML code.
View the Results
Although the EXPORT screen has a preview button that opens your browser, you can also use a Tabtop shortcut to more quickly reach the browser. If the EXPORT window is not open, then a single click will open the HTML window, while a dbl-click will open the browser as well. If the window is already open, then a Tabtop click will open the browser.
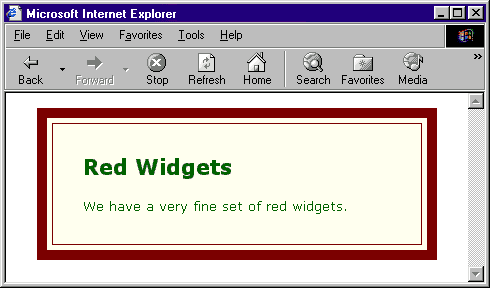
When you are happy with the results of your new page, You may save the HTML code from the main menu's "Save as Auction Code". Save the file as HTML format (the default choice) and it will be ready to use. Or you may save the file as a TXT file to make it easier to open in a text editor for pasting elsewhere.
Sample Marked up Template
The example code below uses a variety of TagBots and illustrates the fact that strict formatting is not required for functional TagBots. Although no spaces are allowed between the Keyword and the Style Symbol or in a Global Target, spaces are allowed elsewhere in the TagBot to improve readability. Line breaks should be used with caution - they are allowed in Prompts and in Default data as long as the breaks in the default data are normally tolerated by the HTML where they will be inserted.
 TagBot™